Wishlist: Image Plates From Random Sites

Monday, March 16, 2015

Sunshine And Rainbows

I have to say I feel really blessed that I get asked to review image plates or nail polishes. It's only been a year since I first was sent image plates to review. And I haven't been sent as many products as other nail bloggers or nail youtube gurus, but each time I feel so humble and honored that they consider my reviews to be valid. Why? Because the nail art community is so BIG, and my youtube, facebook or instagram followers numbers aren't that high.
But still I know my youtube channel, instagram, facebook or blog wouldn't be what it is today if it weren't for my kind hearted partners that consider my reviews to be good enough for their products.

So when Kelly asked if I wanted to do a review of her Spring/Easter collection I again felt so humbled and honored. And I got them last week, I just had to finish the swatching of the Nail Hoot Lacquers swatches.
I have known about this collection from Kelly for a while, she spilled the beans for me a few weeks back. And I was so exited and have been waiting like crazy to get my hands on these. And why is that you ask? Because not only did she release a collection of pastels, but she added a twist to this collection. Each polish has a stunning metallic shimmer to them, and when the light hits your nails you can see the effect really well. I went to Walmart the other day with 2 of the colors on my nails, and I got a few compliments on the colors.

10.1 Polishes are five-free polishes, they apply really nice and dry pretty fast. And Kelly is a sweetheart, always a bonus.

Thank you so much, Kelly for the honor to review your nail polishes. I feel so blessed an humbled to call you as a friend. I love ya, girl.

This collection by 10.1 Polish is called Sunshine and Rainbows, lol sounds like an episode of My Little Pony Friendship Is Magic. But who cares, I don't because we love MLPFIM in this household.
You can find 10.1 Polish on facebook.

Anyhow back to the topic.....
So in this collection there are 6 colors, you can buy them individually. All in very light Spring colors, the only one that isn't a true pastel color is Morning Sunshine. It's a bit too bright to be a pastel, it's still a pretty yellow for Spring season. Also because my skin tone is medium olive, I needed 3 coats on most of these shades. When I applied 2 coats you could still see the smile line on my nails. If your skin tone is lighter than mine 2 coats may be enough for you.


 youtube video of this collection.


Mr Blue Sky is a pastel sky blue color, and you can see the shimmering metallic effect really well in this one. I applied 3 coats over my base coat. I also tested something on my thumbnail over this and Sugar Kisses, I applied 2 coats of Orly's Shine On Crazy Diamond to see if the effect from 10.1 polish would fade. And let me tell you, it didn't If you see in the video when I show close-up of Mr Blue Sky and Sugar Kisses you can see the glitter from the Orly polish. And you can see that metallic shimmer effect  in the 10.1 polishes shine through that Orly polish. 


Sugar Kisses this pastel bubble gum pink is just so pretty. I am not really a pink girl I am very picky about my pink colors, but I like this one. I did  2 coats and again you can see the metallic shimmer effect really well in this one.


Lilac Fields this pastel lilac color is really pretty, the metallic shimmer gets a bit washed out in this one compared to Sugar Kisses and Mr Blue Sky. But you can still see it, it's not like you need a magnifying glass to see it.... LOL... I did  2 coats of this one.


Morning Sunshine this isn't a true pastel yellow, it's a bit too bright for that. But it's still a pretty yellow color. Compared to my China Glaze Sunshine Pop that I don't like on my nails at all. I do not mind this one at all, even tho they are quite similar. Why? Because of the metallic shimmer effect, I just like what it does to the color. I did 3 coats of this on my nails.


Springtime Carpet, this pastel green is just stunning, I loved it right away when I saw it. As with pinks I am very picky with my greens as well. I got compliments on this one and Sweet Sherbet when I went to Walmart the other day, yes I was wearing one color on each hand. I did  3 coats of this on my nails.


Sweet Sherbet this is my favorite in the collection, it got my attention as soon as I pulled it out of the box. It looks a bit washed out on the picture and in the video. I will be wearing this color quite a bit this spring. I did 3 coats on my nails.


On other note, my family got 2 new members added to it. 2 little girl guinea pigs. Floppy (her ears are folded over) and Fluffy, been spending a lot of time this last week to get them used to all of us and settled in. They've decided I must be their huge guinea pig mommy, because they go crazy when I hold them. Floppy is the most vocal one, she is loud when she goes nuts. She squeals very happily when I hold her or go near the cage. My 4 year old loves her Fluffy, my 8 year old who is autistic needs to be told to sit down and spend time with his Floppy. But so far so good, he thinks it's really funny when Floppy poops on him or me. Their cage is right behind me where I do my nails and record my videos so there will be times you can hear them in the videos..

Left is Fluffy 
Right is Floppy


Wednesday, March 11, 2015

Hoot, Hoot, Hot, Hot Nail Hoot Lacquers


I have a friend on facebook Brandie. A very busy mom, her kids are so cute. Anyways, besides being a very busy mom she has started her own Indie nail polish brand. Nail Hoot Lacquers, these nail polishes are five-free.

What is five-free nail polish??? Five-free nail polish: These polishes are not only made without the 3 common chemicals found in nail polishes: Toluene, Dibutyl Phthalate (DBP) and Formaldehyde. But also without 2 other very dangerous chemicals Formaldehyde Resin and Camphor.

Brandie was so kind to send me mini bottles of her whole collection, The Beginning. When I got them I was amazed by the adorable owl label. So cute. And she added a label with the names of the polishes, even tho they were mini bottles. She also included a sheet of paper with information about her polishes, names, descriptions and tips on how to apply them to get the most of the effect of each polish to stand out on the nails.
I have to say I am very impressed with how she's presenting her own polish line, no doubt a lot of love and care for her polishes and clients.

This coming Saturday you can buy the polishes individually, right now you can buy the whole collection:
https://www.etsy.com/listing/223552683/nail-hoot-the-beginning-complete
And the facebook page:
https://www.facebook.com/pages/Nail-Hoot-Indie-Lacquers/791015887614468?fref=ts

I decided to follow Brandie's tips for each color for the swatches.


Look at the cute owl label.


How each color look in the bottle.


youtube video.

The whole collection is amazing, each color changes depending how the light hits your nails. And they all have some glitter or special effect pigment mixed into them. All of these polishes applied like a dream,  didn't matter if they were applied over a white base or just basecoat. And they dried pretty fast too. I also applied my HK Girl fast drying topcoat. 


Let's start with the swatches and my thought of each color.

Exodus
This bright golden apple green color looked very plain in the preview picture. But when I got it, I saw the light gold sheen.The gold is super fine, looks more like a light gold pigment that makes the apple green color POP. I applied 3 coats of this over White base, just like Brandie suggested. I don't have anything like this in my polish collection. But this color is perfect for the upcoming Spring season.

Exodus

Numbers
This Barbie pink color was the last color she added to her collection, when I saw her picture I thought it looked OK. But this color has a pearl like shine to it and depending on how the lights hit your nail you can get some sparkle, but that is very faint. I did 3 coats over White base.

                                     
Numbers


Leviticus
Now this was the color that made my jaw drop to the floor when I saw Brandie's picture. This glittery orange color is AMAZING.  Yes, there are fine holographic glitter mixed into it, but the color goes from orange-red-pink all depending on the light hitting your nails. This is just so stunning to look at, but oh my was it hard to film and take pictures of. I was trying my best to get pictures and recordings showing that amazing color effect. I applied 3 coats over White.
Leviticus

Leviticus 


Deuteronomy
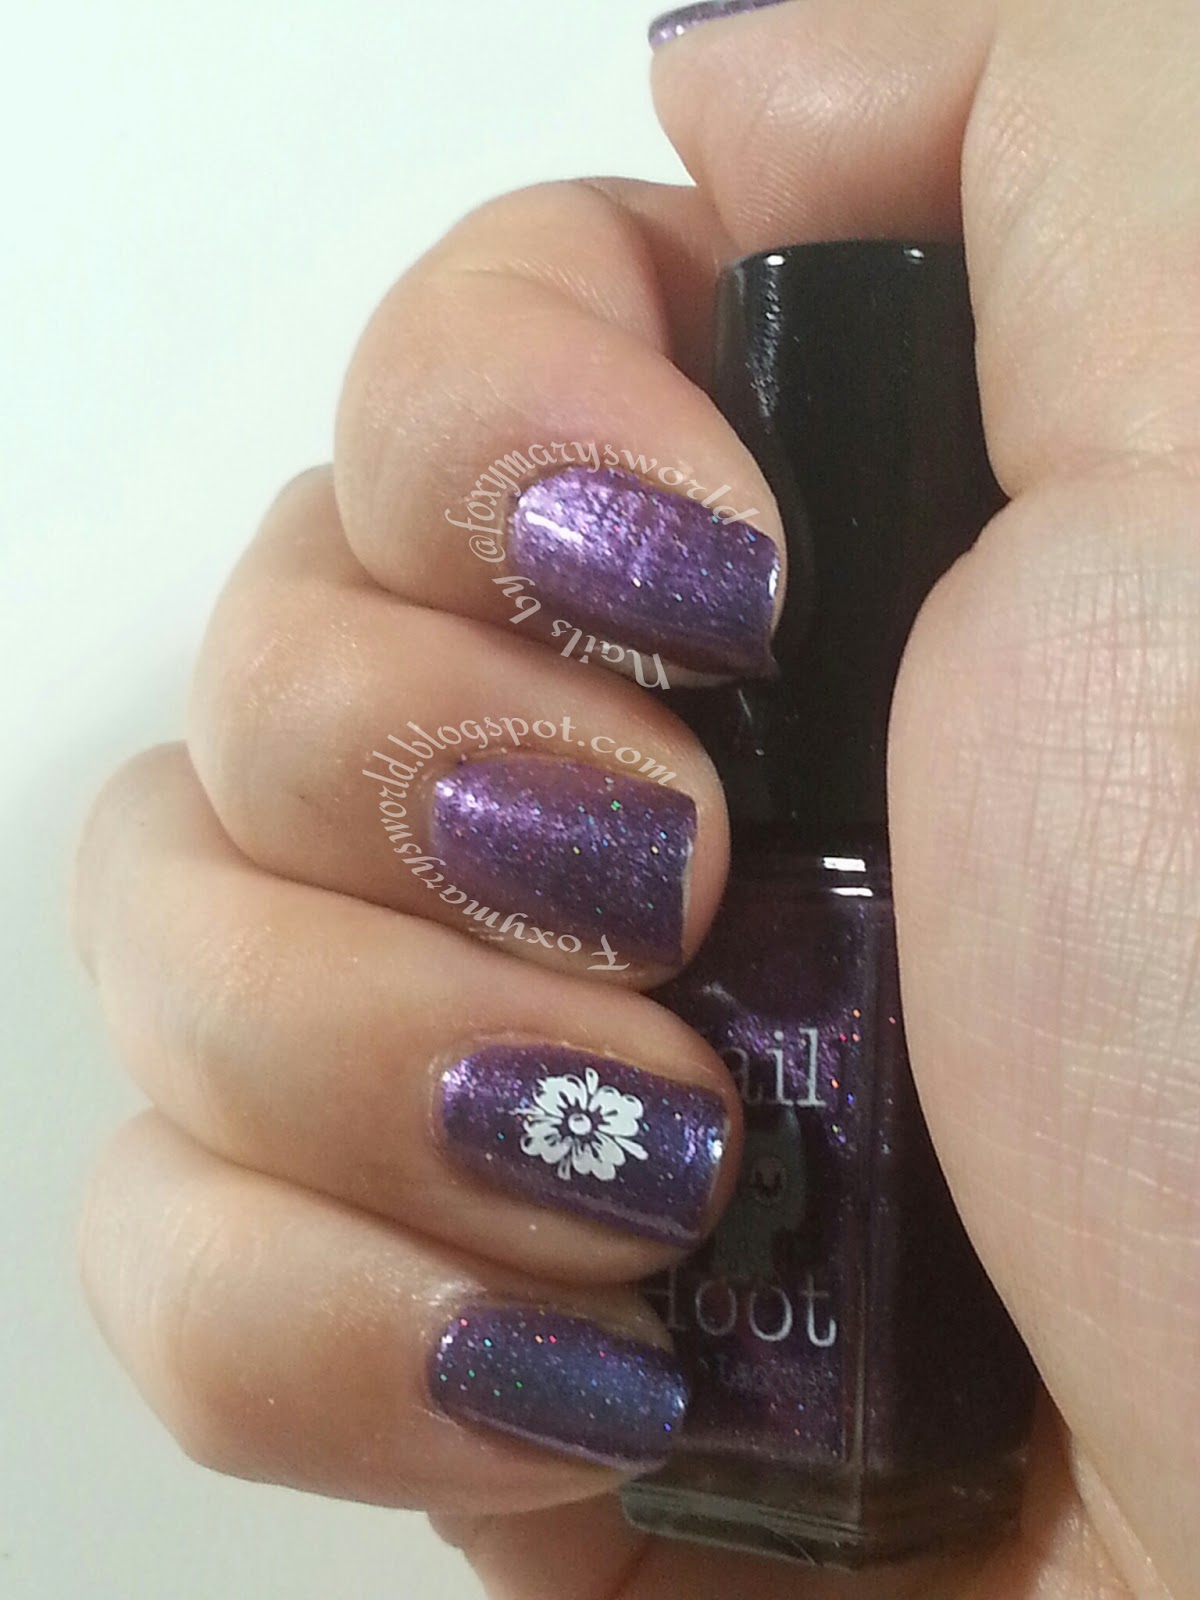
This purple is so pretty, I love purples. And this one also has fine holographic glitter mixed into it. And depending on how the light hits your nails goes from purple to dark blue. Also hard to get a good picture of, but darn pretty to look at. Applied 2 coats over base coat.

Deuteronomy 

Deuteronomy 


 Genesis
This midnight blue shade has holographic glitter mixed into it, but it has a green tint to it. So depending on how the light hits your nail it can go from the blue to a faint dark teal like color. I applied 3 coats over base coat.
 Genesis


Genesis


All in all I am very happy with this collection. I like all the colors, but Genesis, Deuteronomy and Leviticus are no doubt my favorites. I hope I can buy full size bottles of at least these three. I also like Exodus, my least favorite is Numbers. It's pretty but didn't give me the WOW factor as much as the other 4. I can not wait to see what Brandie comes up with next. I am sure it's going to be awesome.

To Brandie:
I hope little Dexter gets better soon, double ear infections for small babies.... Poor little guy. I am sure he is keeping you busy. Thank you so much, Brandie for letting me review your first polish collection. 

Thanks for stopping by.

Tuesday, March 3, 2015

Stamping Better Than Jamberry???

The AIS Sunday challenge this week was Better Than Jamberry. So stamp the nails like a Jamberry nail design, or any other nail wrap  brand design.

I knew what image I wanted  to do, and what plate brand. I just had to find the plate in my Dashica/Infinity  Nails stash. I found the image on Dashica's Dash 15. The reason why I picked this image for this challenge, is because there is another similar image on the Dash plate that can be used as an accent nail. And that is what I wanted to do. So right there was point 1 why I think stamping is better than Jamberry,

Point 2, you can choose what ever base color and stamping color/colors you want for your design.

Point 3. If you're like my, my manis won't last me more than a couple of days at the most. So Jamberry and other nail wraps is a waste on my nails.

Point 4. I can get a few plates for the same price as 2 sheets of Jamberry nails, and I can do so much more with them, and you can use them over and over again.


I painted my nails with OPI Party In My Cabana, pulled out my DRK Nails stamping polish in White and my Dashica Dash 15 plate. Stamped and sealed in the image with HK Girl by Glisten & Glow.

The Jamberry Nail design and my version of it.


I am not saying nail wraps are bad, I have used some a few times. But again, I got tired of my nails after a couple of days and removed them. So again, not the thing for me. I have a couple of sheets of wraps left and I have them ready for those days my nails are naked and I don't have the time to do my nails if I go some place. As for Jamberry, I think they're overpriced. You can find cheaper nail wraps out there in stores or on ebay, aliexpress, banggood etc.


Tuesday, February 17, 2015

Practice, Practice, Practice.

I first got into nail art in 2009, I was siting in an apartment in Long Beach watching youtube videos. And there was this video of a girl stamping Hello Kitty on her nails, that is how my stamping journey started. But it didn't end there later in 2010 I stumbled over another youtube video, of this nail tech doing stunning onestroke flowers on nails. And my dream of becoming a nail tech one day was born, and my dream/goal of one day mastering the art of onestroke painting on nails had started. I started with just getting a few colors of acrylic paint and some brushes. I then realized it looks so much easier on youtube than it is real life.....
Also my never ending hunt for the perfect brush for my nails (so darn narrow) and with the correct softness in brush hairs for onestroke. I am still huntng for it.......
Needless to say a few years have gone by and I have practiced my painting skills and not shown any of my MANY failed tries. The worst have been getting the brush strokes to go all smooth and master all the different flower petal shapes. Then getting them small enough to fit on nails, they always ended up way too big on paper.

Anyways I stayed up mostly all night last night and practiced again. And for the first time since 2010 I have decided to show what I did..... LOL

I've only been able to do this size or even bigger ones.


Tried my best to make a smaller one...


And one more even smaller than that, was tricky getting as many petals I wanted
and in the correct size.


Decided to try and paint on a long nail tip., this was my first time 
painting on a false nail only done on paper until now.


Having carpal tunnel too, makes it harder to hold the paint brush and do the correct brush movements to make the petals. I need more practice before I can try and do this on my own  nails. Don't ask how much time I spent painting these flowers on the paper and false nail.But I am not giving up, I will keep practicing. Hopefully it won't take too long for me to get better in doing onestroke. So for now you have to wait a bit longer for my tutorial of onestroke nailart.


Saturday, February 14, 2015

Knock Out!!

I had a good plan for last week, I had a freehand Valentine's Day Nail tutorial in mind. Monday night I pampered my nails, soaked them, oiled and lotioned, filed and buffed them. All ready for the next day to paint them and have some fun with some acrylic paints.
Tuesday I wake up with the worst cold/flu and I have been knocked out since. Tho last night I was tired and depressed looking at my nails for the 3rd day. So I decided to do something easy. I painted them 2 coats with Sinful Colors Snow Me White, then I grabbed 3 of the Love Bites Collection polishes from 10.1 Polish in; Green-Eyed Monster, Love Bites and Bruised Ego. And did a Distressed Nails look, meaning you wipe off most of the polish from the brush, and apply to your nail. Loos really cool if you do 2-4 colors. More than that I think it starts to look too busy. I applied my topcoat and decided I wanted some decorations too, so I grabbed some Geostuds in Gold I got from dollarnailart and some crystals in Deep Purple from banggood.com. And applied them with my Crystal Katana, the best tool to apply your nail decorations (not to be used with glitter).


Final look.


So far kids are not sick, just husband, granny in-law and me. All 3 of us knocked out. Not been a fun week at all, that is for sure. Now, to make another cup of tea with honey and crawl back to bed. At least I managed to finish another Jo Nesbø book on audible, have 3 more to enjoy.

Thanks for stopping by.


Tuesday, February 10, 2015

My Valentine, Love Me Nails.

Time for another Valentine's Day nail tutorial.
Been so busy making all the videos of the Marianne Nails plates I was sent, dealing with colds and stomach bugs But I wanted to do one more V-day nails, will try and see if I can get one more done. That is if my RL doesn't get in the way.

For these nails I did my base coat, then one thin coat of Sinful Colors Pinky Glitter (830) and then did a gradient effect with Boundless Color Ruby Dust (425).
Then I grabbed my Bunny Nails HD-A, La Femme White and DRK Nails Black

Once I was done stamping I did another thin coat of Ruby Dust to add some sparkle to the stamped images. But not so easy to see in the picture or in the video.


Saturday, January 24, 2015

Kiss Me Nails. Valentine's Day Nails Part 1.

I know I am a bit late starting with a Valentine's Day nail tutorial, but better late than never.
When I got the Love Bites collection from 10.1 Polish I knew I wanted to do some V-day nails using Love Bites. The perfect baby pink color, it's so pretty.
And of course I had to use the Valentines plate from Marianne Nails.

Products used:
 Love Bites
SpectraFlair (14 and 25)
Glamour base
Marianne Nails n 67 and n75
Sinful Colors Black On Black
Creative Shop scraper
Fab Ur Nails XL double ended stamper
HK Girl topcoat


youtube tutorial


before stamping


Final look